
Pricing & Membership
30 Day Guarantee
We really believe in our product. If you follow the steps we suggest and are not happy for any reason, just let us know and you will get a full refund. We offer a ‘questions asked’ guarantee where we will ask you for feedback as our biggest goal is to create the best service in the advice market.
How long must I be a member?
We do not believe in long term contracts. We want you to stay as you can see the value each and every month. If you decide to cancel just let us know and payments will stop from that date.
Help - I lost my password!
Your login is how you get access to the videos. You can reset the password on the login page here. Click the link that says reset password and follow the steps.
How do I cancel?
If you need to cancel at any point just email team@virtualinnovation.co.nz. There are no long term contracts. You just need to give us 1 months notice.
Getting Started
How do I sign up?
To sign up is as simple as selecting a plan on the pricing page based on the number of advisers you have in your business. If you have over 5 let us know and we can work out a special deal for you. Visit the pricing page here.
How Do I get Setup With Multiple Advisers?
We will take you through the process to set yourself up first. Just focus on you (or your key adviser). If you are a team of advisers all wanting the service we are able to discount additional advisers under your brand – Book a call here and we can discuss your needs.
How do I get easy access to the videos?
You have 3 simple options.
Online – Login to your account on this website. You will see a login button at the top right of this page. Press it and login. On that page you will be able to see all the videos you have access to and easy buttons to copy the link and emails to add to your website, emails, social media & newsletters.
Google Chrome – An easy way to get access to your videos is using our Google Chrome extension. It allows you to press a button in your browser and quickly copy a video to paste in to your email or crm. You can download this here.
Mobile Website – Our website is mobile friendly and specially optimised for your smartphone. You can even bookmark it to your home screen.
Open up the dashboard, pick a video and with 1 click copy what you need so you can text message, Watsapp, email or Facebook Messenger a video direct to a client or a prospect.
Any questions just ask us on our contact page here.
How can I use these videos?
How do I share my videos on Facebook?
See how it works in the video below
How do I share my videos on LinkedIn?
See how it works in the video below
Can I add the videos to my website?
See how it works in the video below
Can I add the video to my email signature?
See how it works in the video below
Can I use these with accountants and third parties?
See how it works in the video below
Can I use the videos in my sales process?
See how it works in the video below
Can I use the videos to get more testimonials & referrals?
See how it works in the video below
Mailchimp
How to create and activate your MailChimp account.
Option 1:
We will create your new MailChimp account.
- Provide the email address you want us to use for your new MailChimp account. We will create an account for you.
- Once your MailChimp account is created we will provide you the logins. It is vital you activate this account.
We created a quick video to help you activate your account. Please have a look and follow the steps. It should only take two minutes to complete. Watch Video Here.
Option 2:
Create your own MailChimp account.
Below, you’ll learn how to create your account.
1. Navigate to MailChimp’s signup page and click ‘Sign Up Free’.
2. Type in your Email, Username, and Password. Click Get Started!
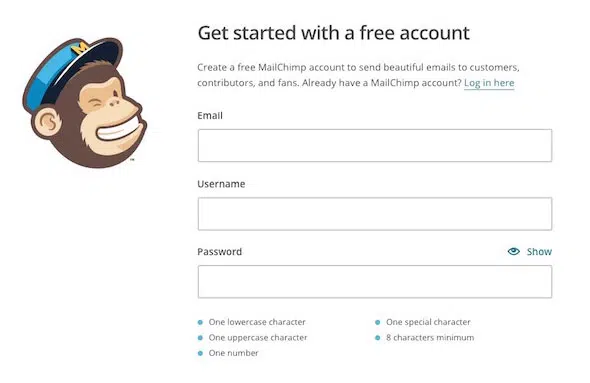
3. A confirmation message will display. Check your inbox for the account activation email to complete your account setup.
Note
- The time it takes to receive the activation email can vary. If you haven’t received the activation email, check your spam folder. You can also activate your account from the login page when you input your credentials and click Log In.
- MailChimp blocks signups from role-based email addresses like admin@hathaway.edu or security@hathaway.edu.
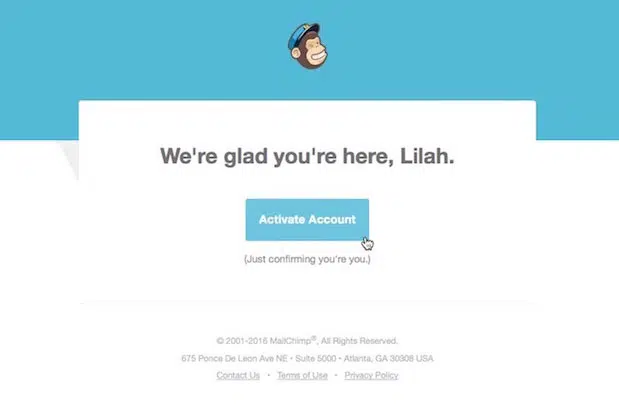
Activate Your Account
After you receive the account activation email from MailChimp Client Services, you can complete the account setup.
- Open the account activation email and click ‘Activate Account’.

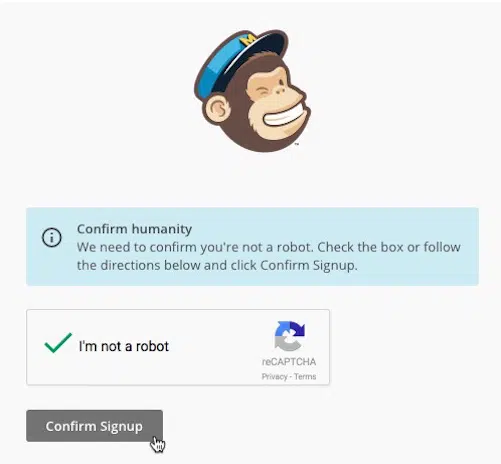
2. On the Confirm Humanity screen, check the ‘I’m not a robot box’ and click Confirm Signup.
The Signup Process
The first time you log in to your account, MailChimp will ask for some required information.
- Name – The name associated with your account profile. The profile is unique to you and allows you access to multiple MailChimp accounts.
- Email Address – The email address where we’ll contact you. Make sure it is an email address you have access to. The reply email address that you use to send emails can be different from this email address.
- Organization Questions – Details about your company. These help us to provide relevant content and guidance.
- Organization Name – The name of your company or organization. It will appear on every email with your physical mailing address.
- Website URL – The website URL for your company, organization, or personal website. This can be the website for your blog, social networking profile, or a personal landing page. We use the URL for a few reasons, like to verify your account for compliance purposes.
- Physical Address – The mailing address where you can receive mail. A physical address is required by law on any email you send out. Ideas for a physical address include your personal address, business address, or a P.O. Box.
After you type in the information, follow the prompts to finish the process and log into your new MailChimp account.
Next Steps. After you activate your account, get to know MailChimp’s features.
- Getting Started with MailChimp. Get an overview of MailChimp basics to get started.
- Verify your domain. Verification makes sure your ‘From’ email address is hosted at a domain that you can access. Free domains, like Gmail and Hotmail, are automatically verified. If you want to send from a personal or company domain, you’ll need to go through the verification process before you can send emails through MailChimp. It’s best to send email campaigns with a personal or a company domain. Many free email providers have implemented DMARC authentication policies that affect the delivery of email campaigns that use a free provider’s domain for the ‘From’ email address.
- Add other people to the account. If you want multiple logins for your account, you can invite users. Set different levels of permission based on how much access you want each user to have.
Invite ShareThis.Video as a user to your MailChimp account. Please send the invitation to stephen@marketingforadvisers.co.nz.
How to Grant ShareThis.Video access to your MailChimp account.
Option 1:
We will send you a request email to give us access to your MailChimp account.
- Open the email with the subject line ‘An agency requested access to your account’.
The email content will be ‘Stephen Martin has requested access to your MailChimp account’. This request will expire after 7 days. - Click the blue ‘Review Request’ button.
- A window of the request will appear.
Choose ‘admin role’ and click ‘Grant Access’ button.
Option 2:
Here’s how to grant us access as “Manager” user to your MailChimp account.
See steps below:
- Log into your MailChimp account.
Log in using your account username and password.
- Once logged in, click on your username in the upper right corner to display a drop-down menu.
In the drop-down menu, click on “Account”.
- On the Account page, you should see some options toward the top of the page. Find the “Settings” option and click on it to reveal another drop-down menu.
- In the Settings drop-down menu, click on “Users”.
On the “Users” page, find the dark grey button labelled “Invite A User” on the right and click it.
- In the first field, enter the email address of the user you want to invite.
Please enter stephen@marketingforadvisers.co.nz (ShareThis.Video Mailchimp email)
- Next, select the user type you want to assign to this user.
Please set as “Manager” for us to set-up your newsletters monthly.
- You can optionally send the new user a message in the message box at the bottom of the form. Adding a new user does not require a message. This message will appear in the invitation email sent to the new user.
- Once the form is complete, click the ‘Send Invite’ button.
How to import your list or contact database on your MailChimp.
Option 1: Our team can help you to import your list, just send us a CSV or Excel file.
Option 2: Import your contact database on your MailChimp account.
First, you’ll need to prepare your spreadsheet file of contacts outside of MailChimp, and save it as a CSV file. Then Log in to your MailChimp account and use the List Import Builder to upload your file.
To upload your subscribed contacts to MailChimp, follow these steps.
- Navigate to the Lists page.
- Click the drop-down menu next to the list you want to work with, and choose Import.

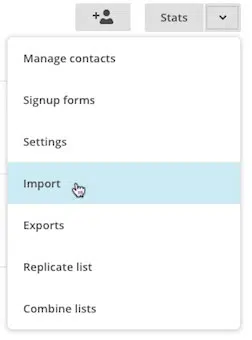
- Choose CSV or tab-delimited text file.
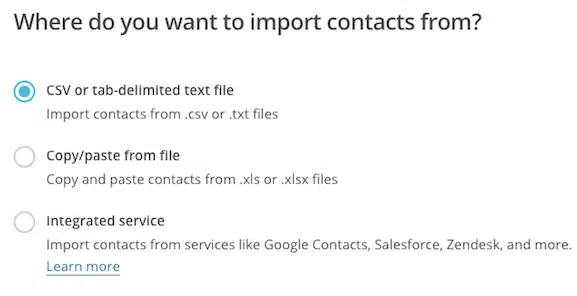 If your last import was a CSV with the same columns, you can click Use settings from last import , which will allow you to skip steps 7-11.
- Click Next.
- Click Browse and choose the file from your computer.
- Check the box next to ‘I understand that my billing plan may be automatically upgraded’. Your account will only be upgraded if your list import causes your subscriber count to exceed your current billing plan.
- Click Next to go to the Import Subscribers step and match the columns in your import file to the fields in your MailChimp list.

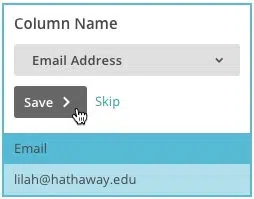
- Click Save for the Email Address column. We automatically match the column in your import file that contains email addresses to the required Email Address field in your list.

- On the second column, check that the column name and field type are correct, and click Save. Or click the drop-down menu to select a different field type. To create a new column in your list, choose ‘New Column Name’.


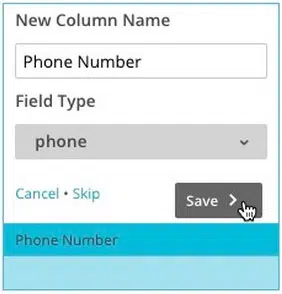
The editing pane for each column includes the current column name, field type, and example data from your list, for your reference. To exclude a column from the final import, click Skip.
- Repeat Step 9 for all unmatched columns. You must match or skip all columns to complete your import. After you’re finished matching, we’ll display a success message.

- Click Next to review your final import settings.
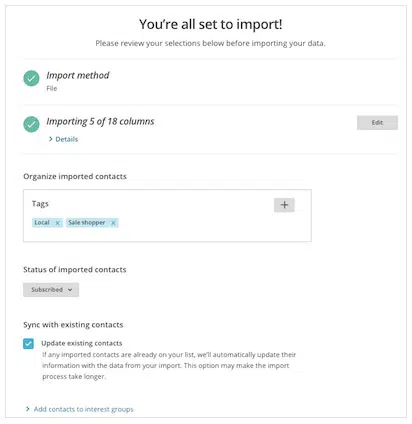
- On the ‘You’re all set to import!’ screen, review the settings for your import. Be sure to keep the Subscribed option selected. If you want to assign tags to your imported contacts, click the Plus (+) icon in the Organize imported contacts section.

- After you’ve reviewed your settings, click Import.

After the import is finished, we’ll send a notification to the email address associated with your username. Be sure to check out the Lists page in your account to see all your new subscribers.
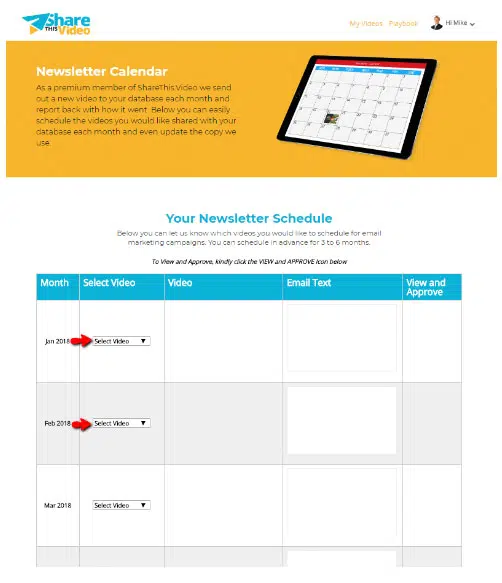
How to use the ShareThis.Video calendar
You can schedule, select, edit and approve the videos you want to use for your newsletters on your calendar. Watch the video here.
- a. Go to your ShareThis.Video account.
- b. On the upper right corner, beside your name, click on the dropdown menu.
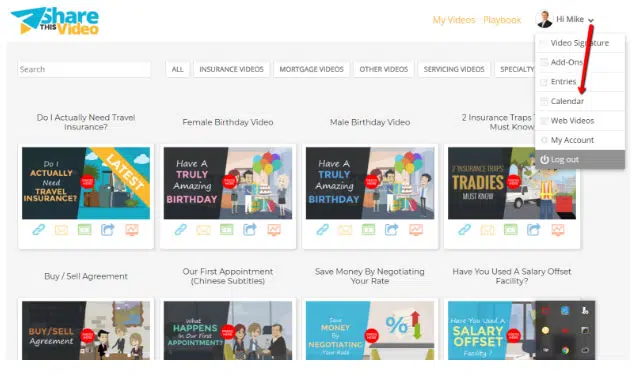
- c. Your calendar menu will appear, pick videos for up to 12 months in advance.
- d. You will be able to adjust the newsletters copy to fit your style. Just edit or add on the email text area.
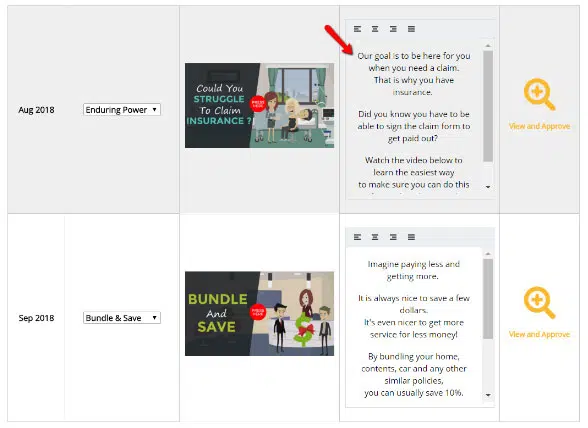
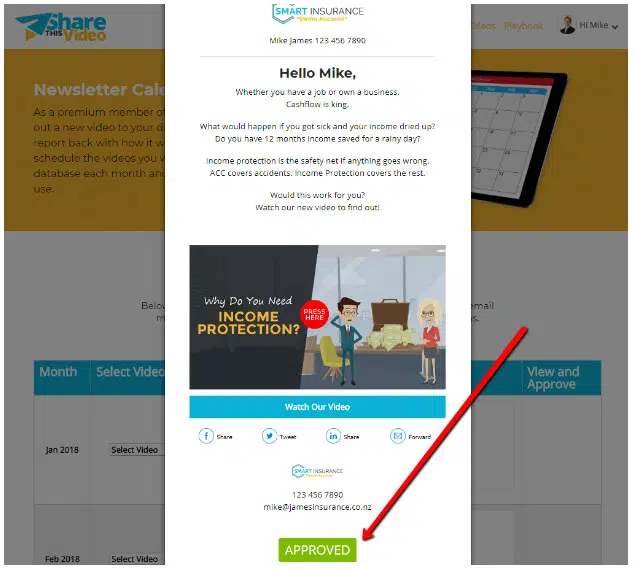
- e. If you don’t have further tweaks and want to view your selected newsletter, you can click on ‘View and Approve’ icon.

- f. Click ‘Approved’ button if you are happy and we will set this up on your MailChimp account.
It is very easy to do. We will give you a nudge if you have not picked your topic for the next month.
Anything you need, just send us an email at team@sharethis.video.